Peer Connection Configuration
The Peer Connection is configured in the following steps.
Step 1: Create Crypto Token for Peering Key
To create a Crypto Token for the Peering Key, do the following:
Create a Crypto Token on the EJBCA instance by selecting Crypto Tokens under CA Functions.
Click Create New.
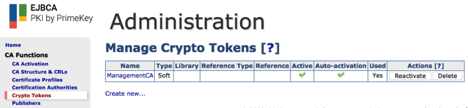
Enter a Name for the Crypto Token, an Authentication Code and enable Auto-activation to ensure that the Crypto Token comes online and is available after a reboot. Click Save.
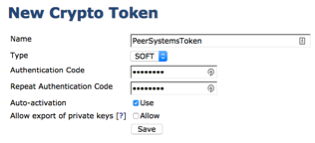
Enter the key name signserver_peer_systems_key, select RSA 2048, and click Generate new key pair.

Step 2: Create a Certificate Profile for the Peer
To create a Certificate Profile for the Peer, do the following:
Select Certificate Profiles under CA Functions.
In the List of Certificate Profiles enter a name such as SignServer Peer Profile and click Add.
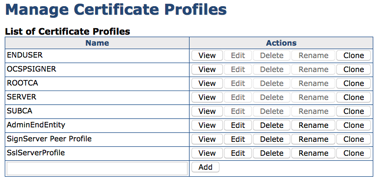
Click Edit on the newly created SignServer Peer Profile. Select the following options in the profile and click Save:
Available Key Algorithms: RSA
Available Bit Lengths: 2048
Validity or end date of the certificate: 10y
Extended Key Usage: Client Authentication
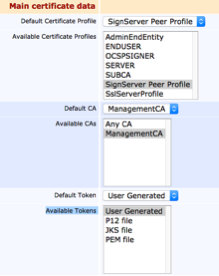
Under RA Functions, select End Entity Profiles.
Enter a name for a new profile in the Add Profile Field such as SignServer Peer EE Profile, and click Add.
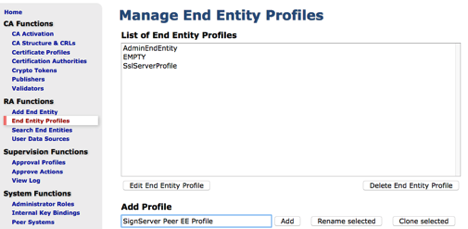
Select the SignServer Peer EE Profile and click Edit End Entity Profile.
Within the profile select the following values and then click Save.
Default Certificate Profile: SignServer Peer EE Profile
Available Certificate Profiles: SignServer Peer EE Profile
Default CA: ManagementCA
Available CAs: ManagementCA
Default Token: User Generated
Available Tokens: User Generated
Step 3: Setup the Key Bindings
Setup the key bindings in the following steps:
Click Internal Key Bindings under System Functions.
On the AuthenticationKeyBinding tab, click Create new and specify the following:
Name: Peer System Key Binding to SignServer
Crypto Token: PeerSystemsToken
Key Pair Alias: signserver_peer_systems_key
Signature Algorithm: SHA256WithRSA
Protocol and Cipher Suite: TLSv1.2;TLS_RSA_WITH_AES_256_CBC_SHA256
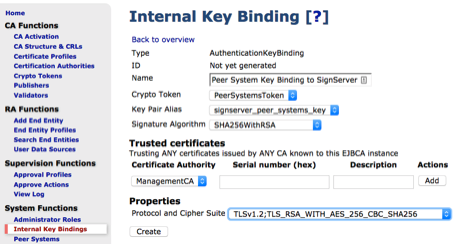
Click Create and then click Back to overview.
Step 4: Generate a CSR for the KeyBinding
Do the following to generate a CSR for the Key Binding:
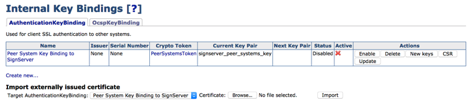
In the Internal Key Bindings overview, select the CSR action for the Peer System Key Binding to SignServer to download a CSR.
Save this file to a location on your computer.
Select RA Web in the EJBCA Admin Web menu to access the RA Web.
In the EJBCA RA, click Make New Request.
In Certificate Type, select the SignServer Peer EE Profile. Then upload the CSR by clicking Browse to select the CSR downloaded in the previous step and click Upload CSR.
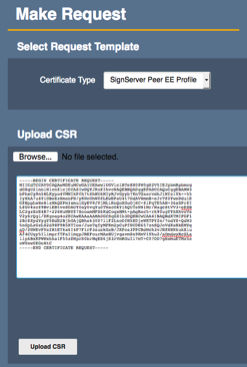
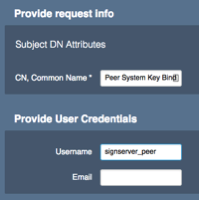
Change the CN, Common Name if desired, and then enter the Username “signserver_peer”.
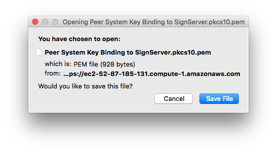
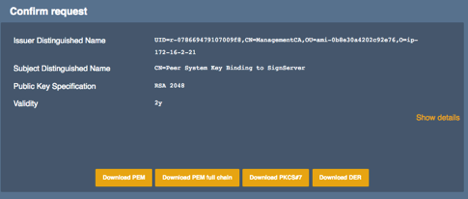
Click Download PEM to download the signed certificate and save this file to a location on your computer.
Go back to the EJBCA Admin Web and select Internal Key Bindings under System Functions.
Under the Import externally issued certificate header, click Browse, select the PEM file downloaded in the previous step and click Import.
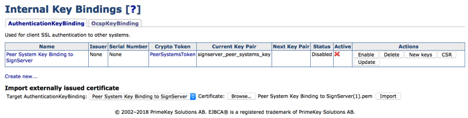
A notification appears at the top that the Operation completed without errors.
Click Enable on the Key Binding. A notice appears at the top that the Peer System Key Binding to SignServer status is now ACTIVE and a check-mark indicates its active status.
